Building Full Stack Applications With Redis Stack
How we built a credential issuing & management solution with Redis Stack at Top Universe
We will follow this article in this order. Feel free to jump to the part that interests you the most. Thanks.
Overview
What is Redis Stack and why should you care?
Installing Redis Stack
What is Redis Enterprise Cloud?
Understanding Redis Modules
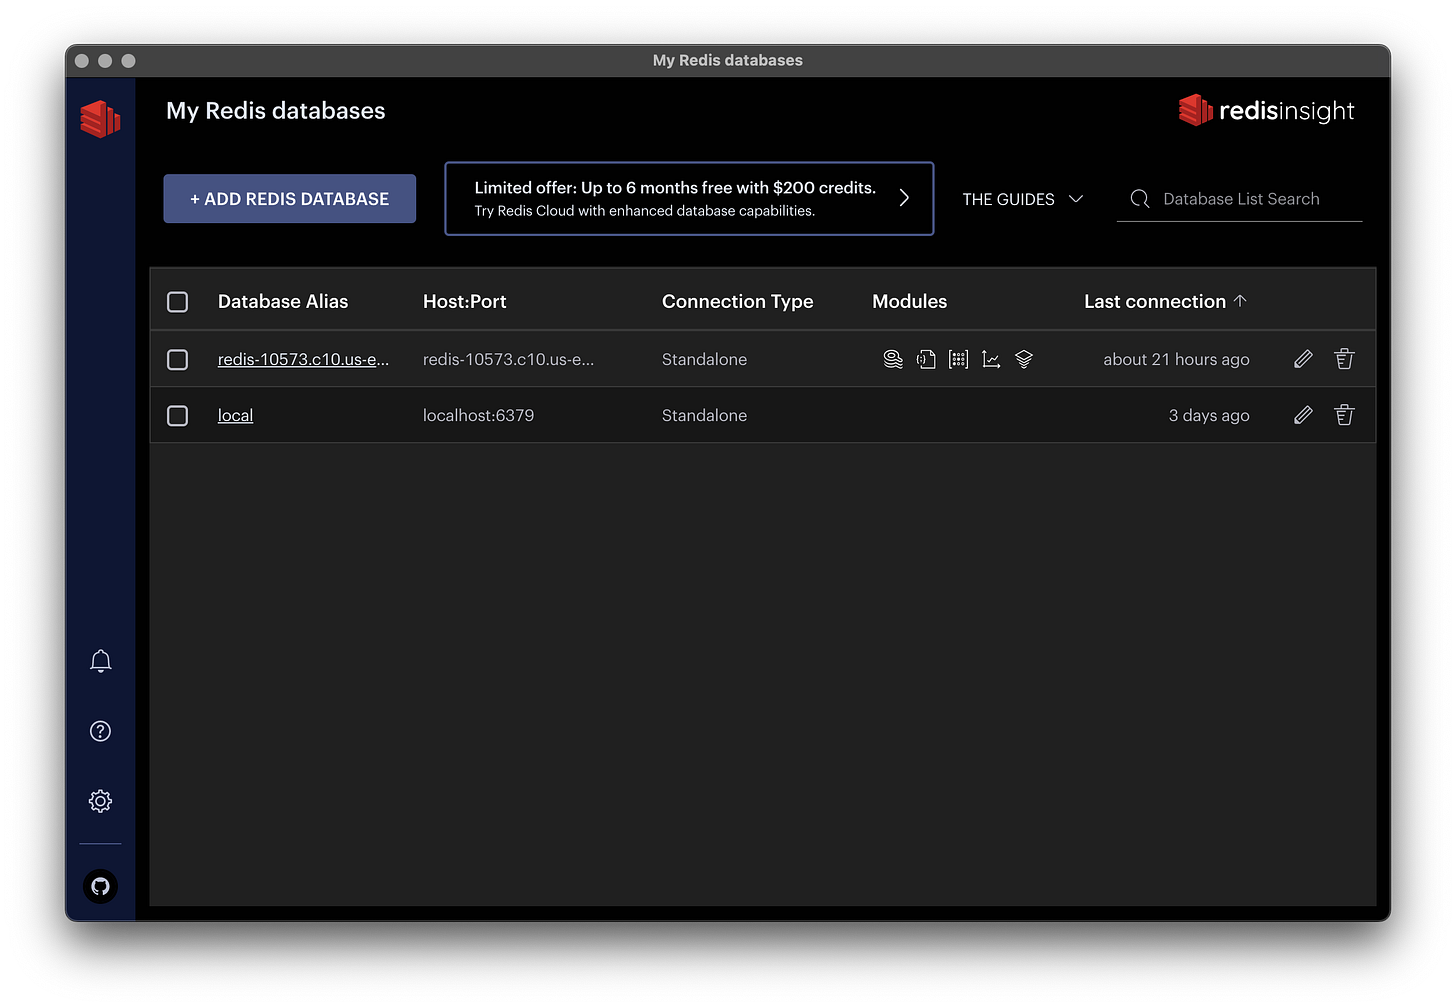
What is Redis Insight?
What is Redis JSON?
Setting up Our Project
Testing our Project
Conclusion
At this point, my developer friends would agree that i am becoming a Redis Fan Boy, Or as my friend would often say *A Redis Geek*. With more than 12 years of experience as a software engineer, all i can say is that Redis is amazing.
Of course i have many reasons though, let me walk you through on this one.
While training some beginner backend developers we built this project using RedisJSON. Feel free to fork the code and make it better.
What is Redis Stack & why should you care?
As we know Redis is an in-memory data store that is frequently used as a cache and a message broker. It is known for its high performance and flexibility, making it a popular choice among developers.
Redis can be used as part of a "Redis Stack," which refers to combining Redis with other technologies to create a complete web application (Beyond caching). A typical Redis stack would consist of a front-end web framework, a database for persistent storage, and Redis for caching and real-time data updates.
Redis stack can provide several advantages. Because Redis is an in-memory store, it can perform certain types of data and operations much faster than a traditional database. This makes it ideal for use as a cache, where it can temporarily store frequently-accessed data and improve application performance.
Redis also has strong support for data structures like lists, sets, and hashes, which can be used to manage and manipulate complex data efficiently. This makes it an excellent choice for applications requiring real-time data updates, such as online games or chat apps.
Redis has a rich set of features that make it a powerful tool for building web applications, in addition to its speed and data structure support. These include transactions, publish/subscribe messaging, and an easy-to-use API.
Overall, incorporating Redis Stack into your application stack can provide significant benefits to web applications, making it a popular choice among developers. Redis is worth considering as part of your technology stack whether you're building a simple cache or a complex real-time application.
Redis Stack supports:
Probabilistic data structures
Queryable JSON documents
Querying across hashes and JSON documents
Time series data support (ingestion & querying)
Graph data models with the Cypher query language
When working with Redis Stack, there are three distinct Redis Stack packages to choose from:
Redis Stack Server: This package only includes Redis OSS and module extensions. It lacks Redis Insight, the developer desktop application. This package is intended to be a drop-in replacement for Redis OSS (for example, if you're already using Redis OSS as a cache).
Redis Stack (Desktop): This package includes everything a developer requires in a single package. Redis OSS and module extensions, as well as the Redis Insight desktop application, are included. This is the package to use if you want to develop an application locally and investigate how it interacts with Redis.
Redis Stack Insights: Only RedisInsight, the developer desktop application, is included in this package. Choose this package if you've used Redis Stack Server and want to explore your Redis data with Redis Insight.
Installation Redis Stack
Installing Redis Stack is incredibly easy, based on your operating system, you would want to follow the installation instructions on the documentation.
Installation instructions on a Intel & Apple Silicon Mac Devices:
If you’re a Mac user, simply open up your terminal & run the following commands to tap the Redis Stack Homebrew tap:
brew tap redis-stack/redis-stackNext Run brew install:
brew install redis-stackIf you’re using an intel based Mac, run the next command on your terminal, specifying the redis-stack version that you just installed:
export PATH=/usr/local/Caskroom/redis-stack-server/<VERSION>/bin:$PATHIf you’re running an AppleSilicon Mac, run this command instead:
export PATH=/opt/homebrew/Caskroom/redis-stack-server/<VERSION>/bin:$PATHInstalling Redis Stack automatically installs Redis Insight.
Understanding Redis Modules
Redis modules extend the server's functionality in various ways to meet your application and business requirements.
As a solutions architect, I've received numerous requests from customers and engineering teams for feature complex implementations, which frequently cause chaos during system implementation due to the increasing learning curve when the product architecture on backend infrastructures changes.
You could use the Redis modules to extend your product's functionality such as search, pub-sub, No-sql database storage, and much more. Here are some examples of Redis modules and their applications:
RediSearch
A query and indexing engine for Redis, providing secondary indexing, full-text search, and aggregations.
RedisJSON
RedisJSON - a JSON data type for Redis
RedisGraph
A graph database as a Redis module
RedisBloom
Probabilistic Datatypes Module for Redis
Redis-cell
A Redis module that provides rate limiting in Redis as a single command.
RedisTimeSeries
Time Series data structure for Redis
RedisAI
A Redis module for serving tensors and executing deep learning graphs
You can see the details on these modules here.
What is Redis Insight?
Redis Insight is a powerful tool for visualizing and optimizing Redis or Redis Stack data, making real-time application development easier and more enjoyable than ever before.
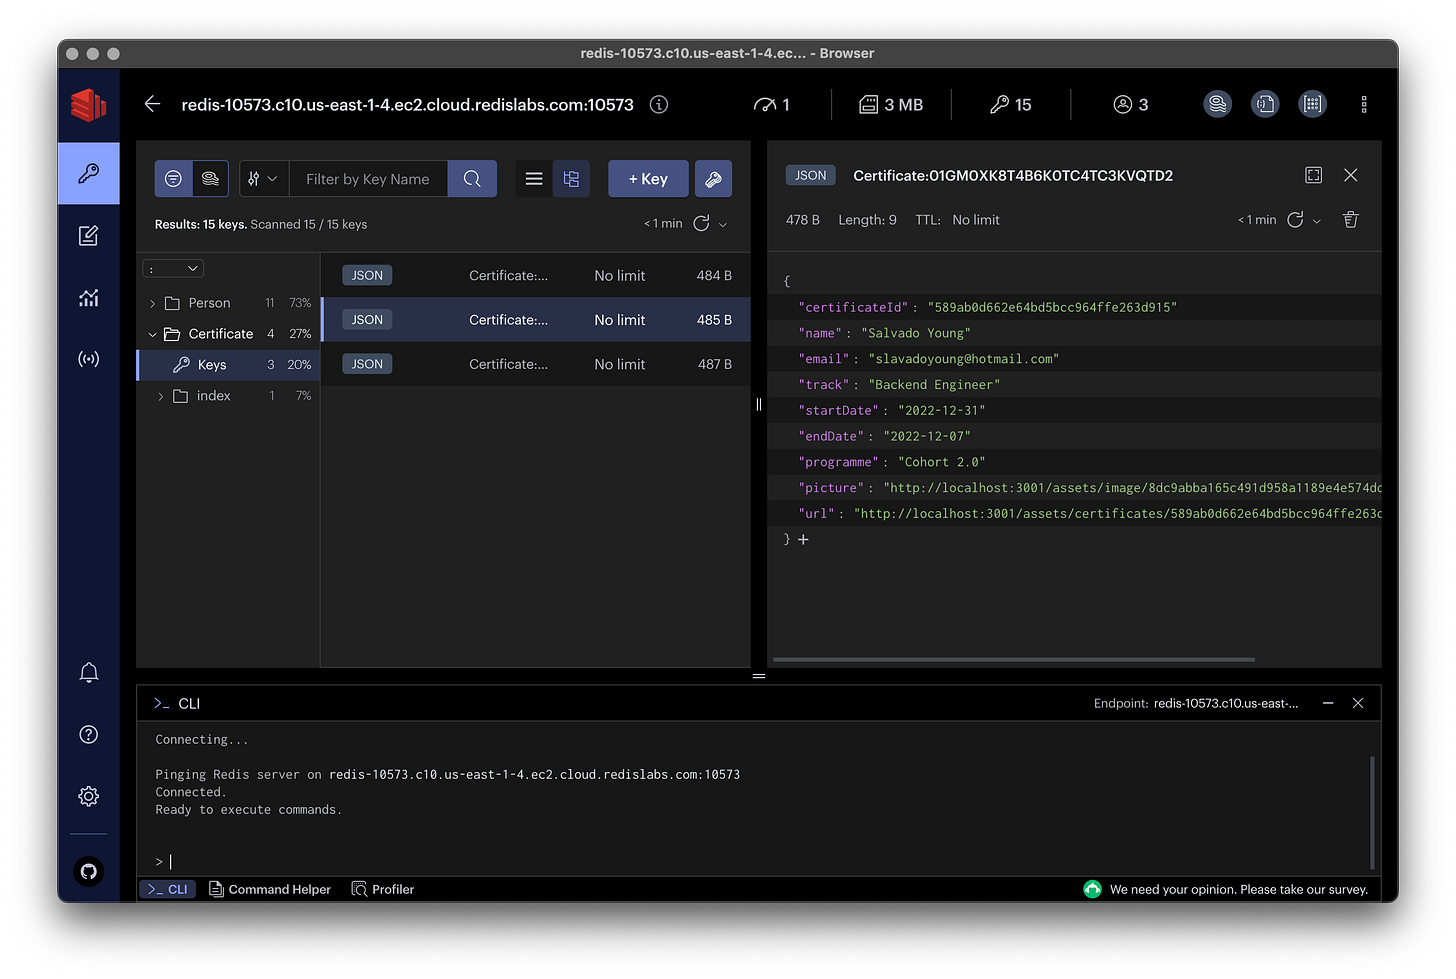
Redis Insight allows you to perform both GUI- and CLI-based interactions in a fully-featured desktop GUI client that includes Automatic Connection Management, a Redis Browser for exploring and previewing your data, a Profiler for analyzing every single command sent to redis in real time, an integrated command line interface (CLI), and a workbench for virtualizing your queries, indexes, and data aggregation workflows, and much more.
Learn more on this on the official docs
What is Redis JSON?
Redis JSON support is provided by the RedisJSON module. RedisJSON, like any other Redis data type, allows you to store, update, and retrieve JSON values in a Redis database. RedisJSON also integrates with RediSearch to index and query JSON documents.
Read this Blog Post to learn more about RedisJSON using the nodejs redis-om library.
What is Redis Enterprise Cloud?
Redis Enterprise Cloud is a cloud service that is fully managed for hosting and running Redis databases. Redis Labs, the company behind the open-source Redis database, provides it.
Redis Enterprise Cloud enables users to quickly and easily set up and manage Redis databases in the cloud, eliminating the need for complex infrastructure and operational tasks. It includes features like high availability, automatic scaling, and backup and restore, making it a dependable and powerful solution for running Redis databases in the cloud.
Setting up our Project
In our project, we will setup a free Redis instance in the cloud using the Redis Enterprise Cloud.
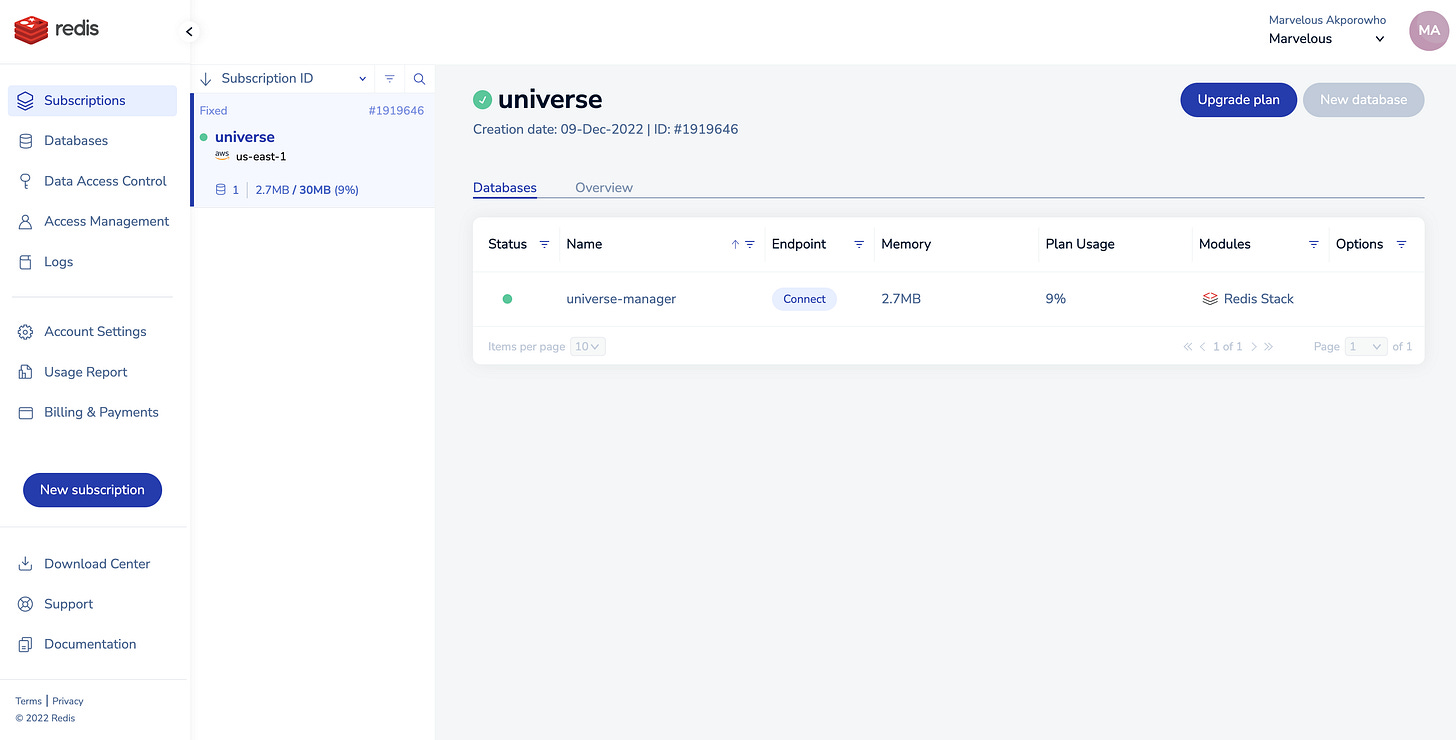
I will walk you through on how to create a subscription and database in the redis enterprise cloud dashboard.
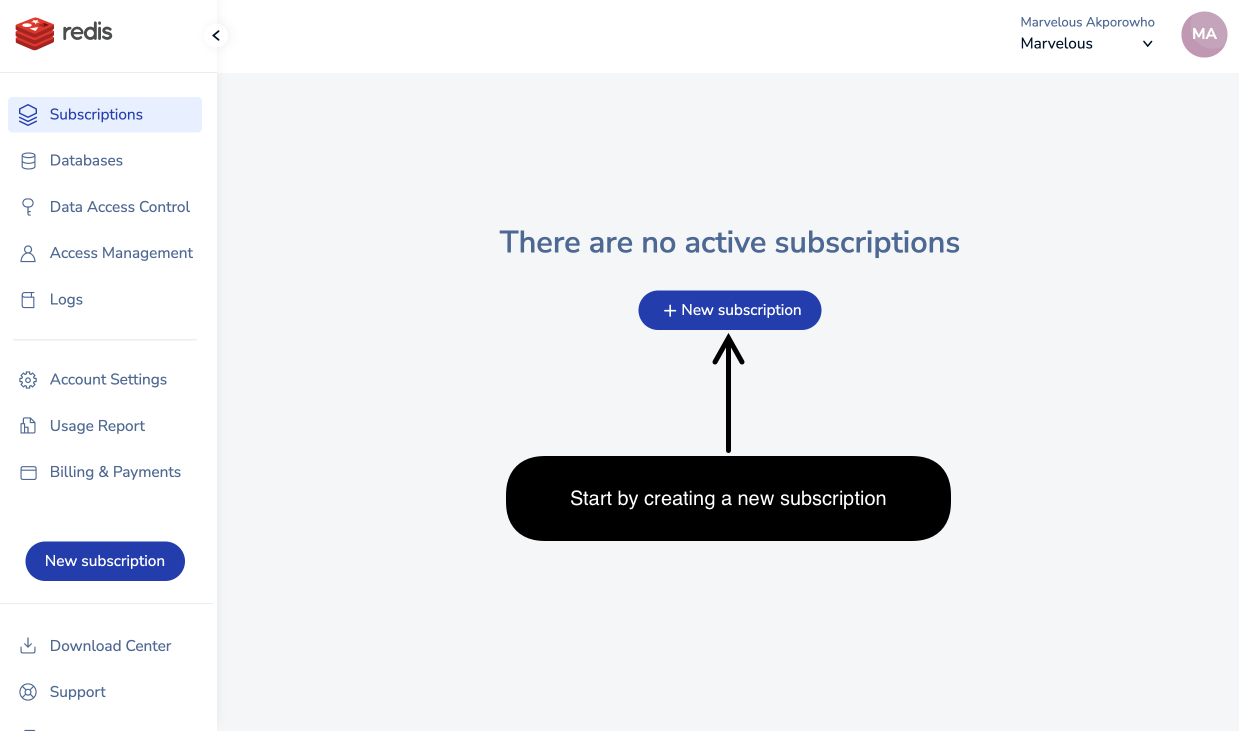
Step 1: Click on the create a subscription button
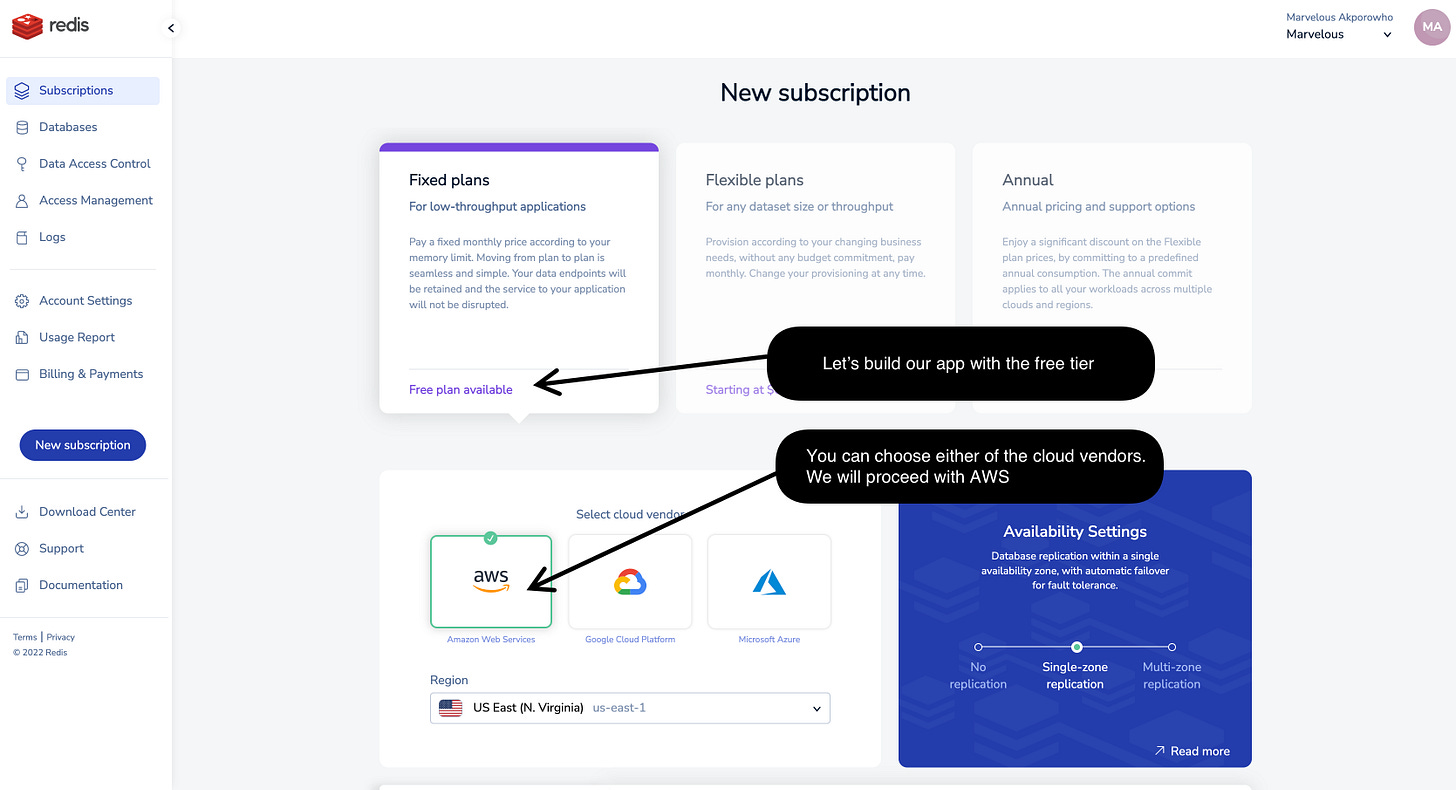
Step 2: Select your preferred cloud provider and subscription plan (in this example, we will start with the free plan)
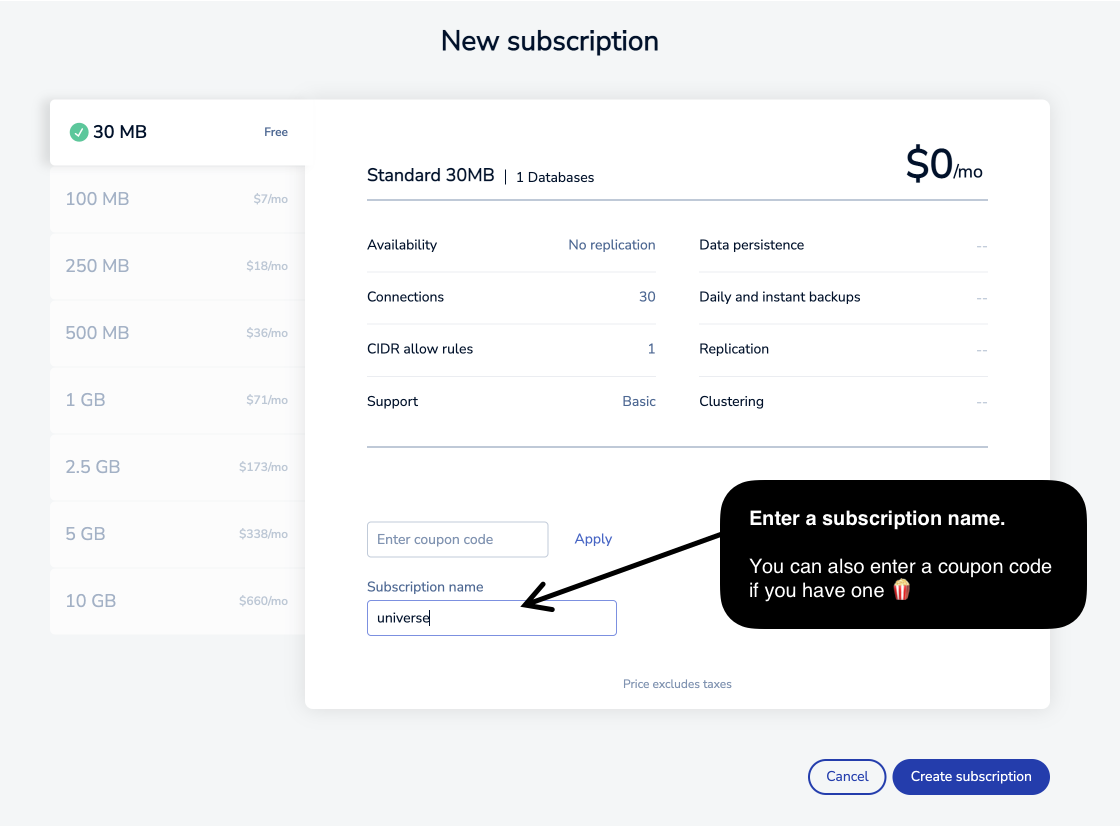
Step 3: Enter the name of your subscription. You can also enter a coupon code if you have one
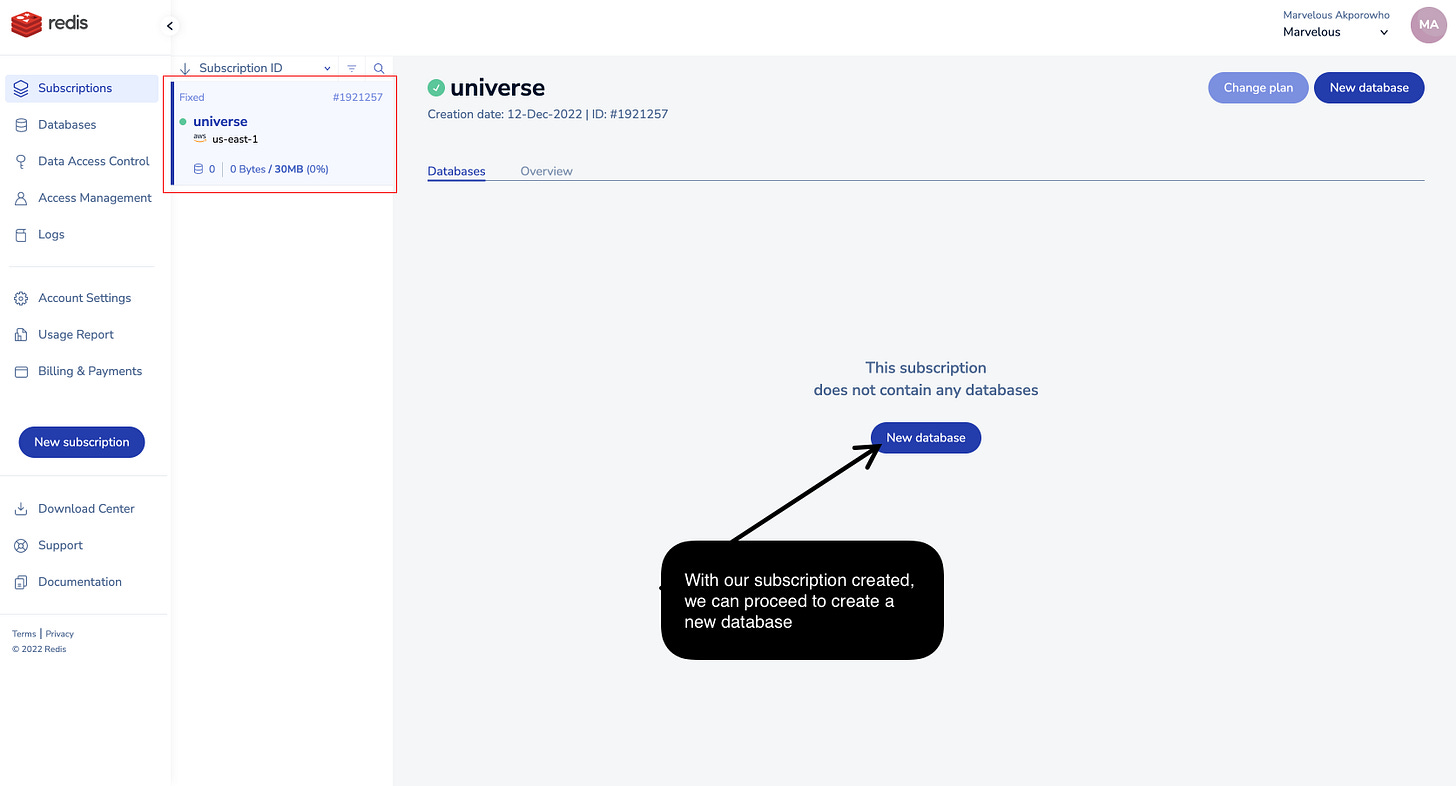
Step 4: Now that we have a subscription, we can create a new database by clicking on the new database button.
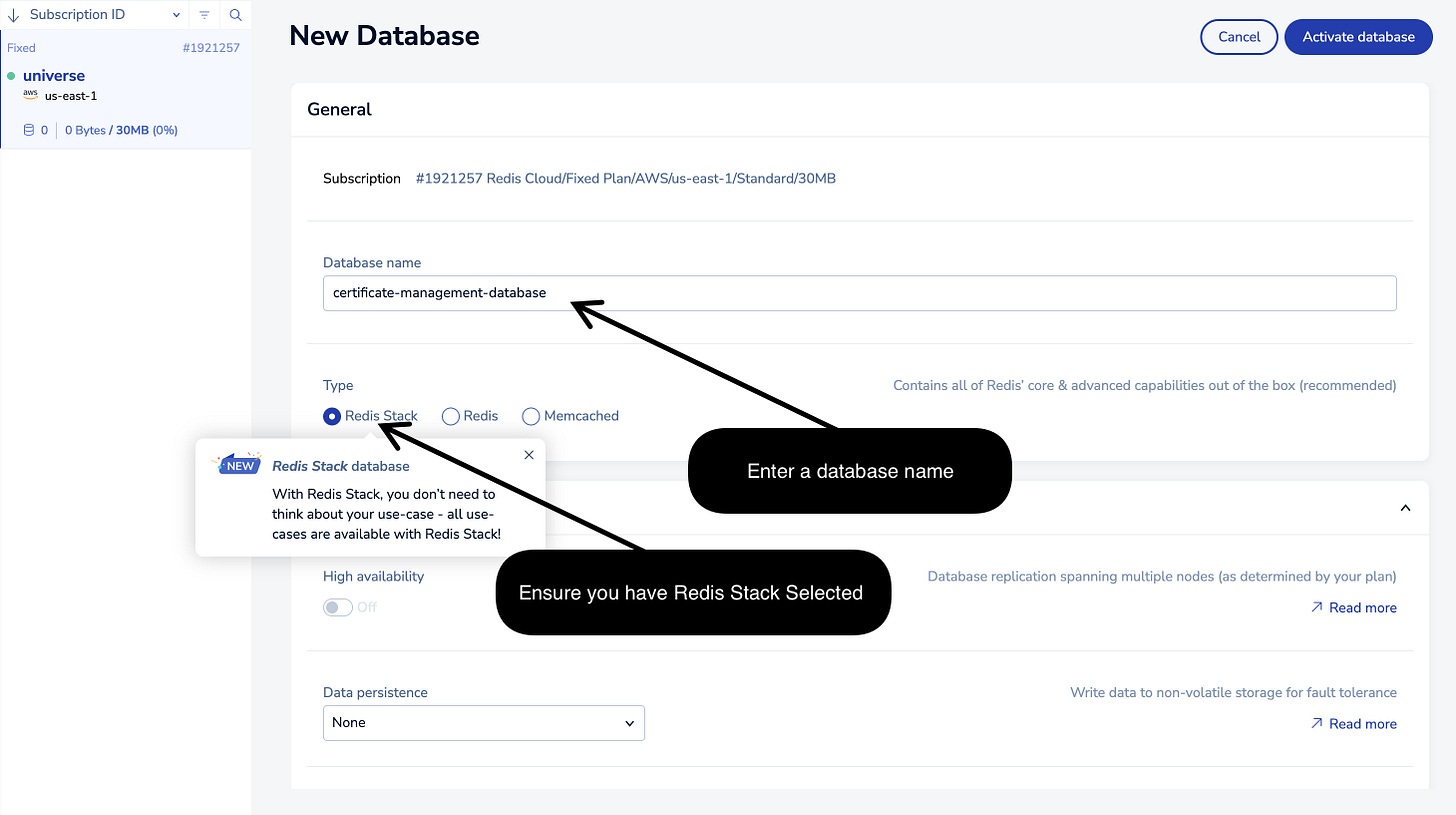
Step 5: Enter the name of your database. Also select Redis Stack to use the modules as we have explained earlier
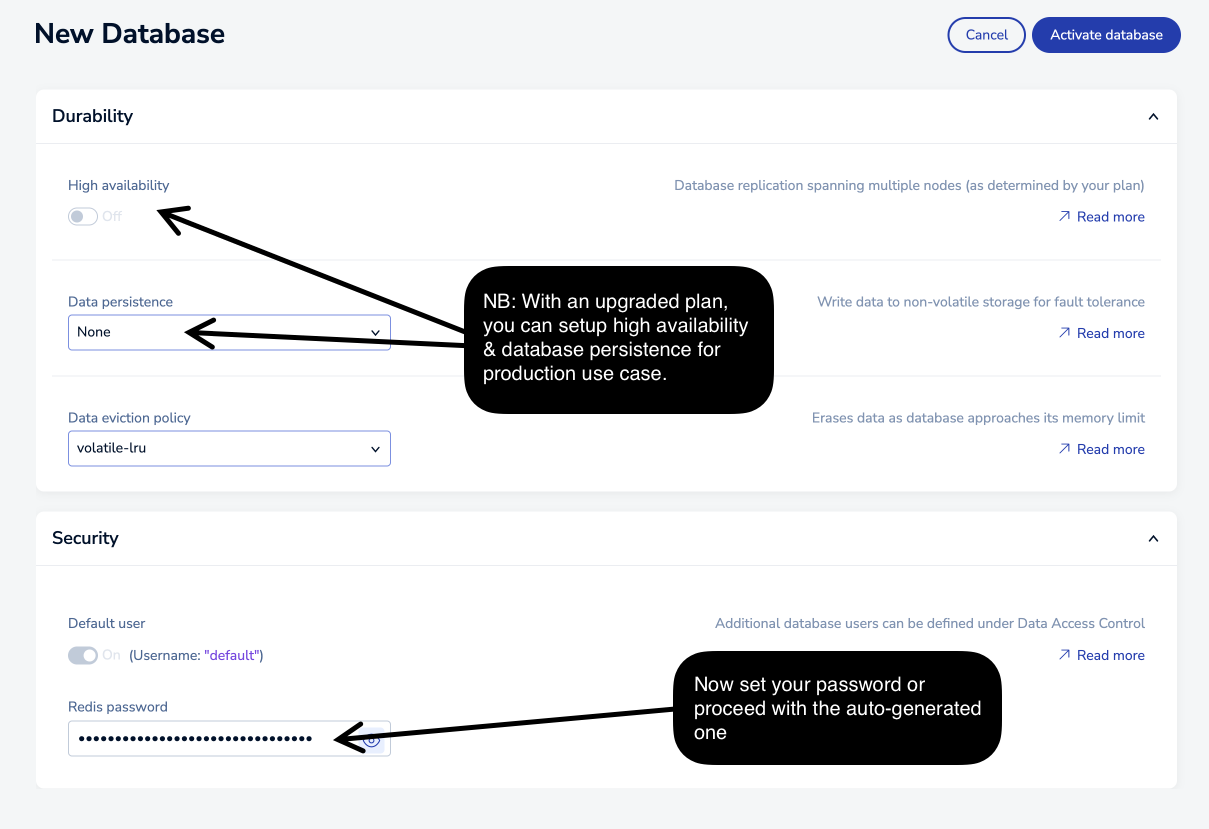
Step 6: To get high availability and data persistence enabled, you have to upgrade to a premium plan. For our example, we will not do that. Also set your password or continue with the default password
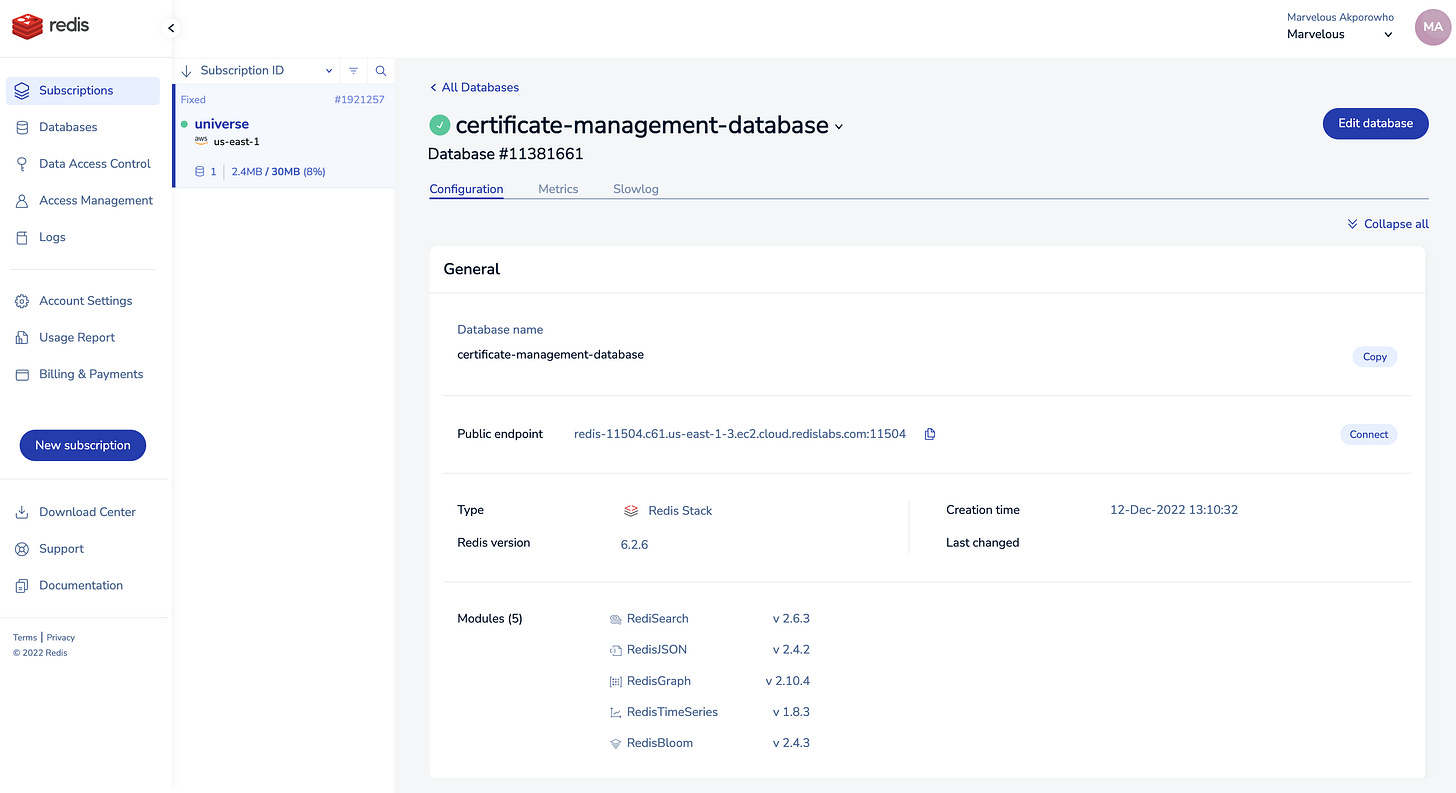
🎉🤩 Now you have your database up and running.
Next, you can clone our repository from the Github Repository
Setting up the Backend
When you open the backend directory, you can follow the instruction on the README.md file to setup the backend project.
Environment file (.env)
Paste your database public endpoint along side your password in your environmental variable REDIS_URL
redis://<YourUsername>:<YourPassword>@redis-10573.c10.us-east-1-4.ec2.cloud.redislabs.com:10573REDIS_URL=redis://<YourUsername>:<YourPassword>@redis-10573.c10.us-east-1-4.ec2.cloud.redislabs.com:10573
HOST=http://localhost:3001
PORT=30001To run the express & nuxt project, you should have node v16.18.0 or higher. Simply install the node packages using:
npm iNext, run the command below to start our express app in the backend directory
npm run devWe are using Nuxt.JS for our UI service (frontend app). Navigate to the ui service, run:
npm i Next, run the nuxt project using the command below:
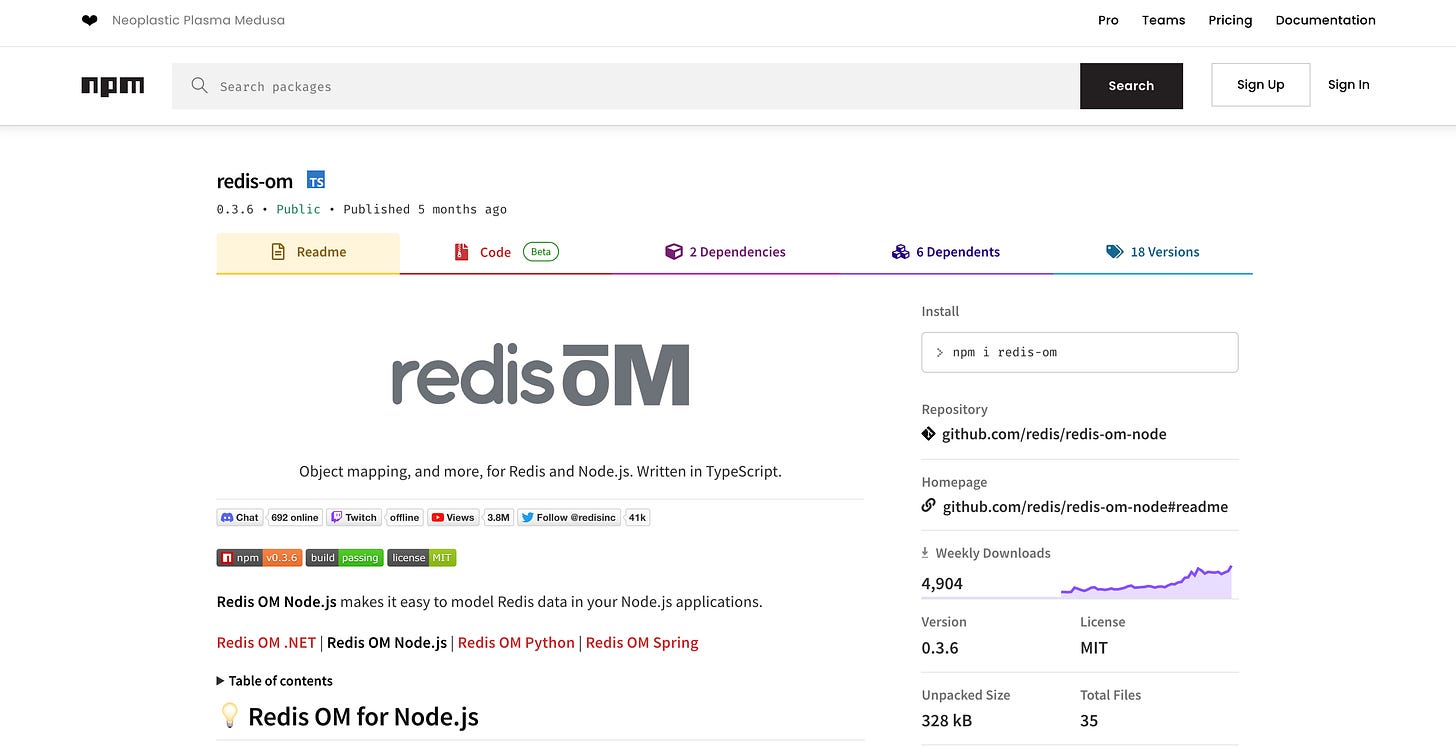
npm run devWe used the redis-om nodejs library to setup our schema and queries within the project.
NB: We are only showing the certificate package portion of the backend code, Kindly Clone the codebase from the github repository.
Schema.js
(Our Redis Object Schema)
const Joi = require('joi')
const { db } = require("../../database")
const { Entity, Schema } = require("redis-om");
class Certificate extends Entity { } /* our entity */

// joi schema -> Create Certificate JSON Object
exports.createCertificateSchema = Joi.object().keys({
    name: Joi.string().min(3).lowercase().required(),
    email: Joi.string().lowercase().required().email(),
    track: Joi.string().min(3).lowercase().required(),
    startDate: Joi.string().min(3).lowercase().required(),
    endDate: Joi.string().min(3).lowercase().required(),
    programme: Joi.string().min(3).lowercase().required(),
    picture: Joi.string().min(3).lowercase(),
})

/* create a Schema for Person */
const certificateSchema = new Schema(Certificate, {
    certificateId: { type: "string" },
    name: { type: "string" },
    email: { type: "string" },
    track: { type: "string" },
    startDate: { type: "string" },
    endDate: { type: "string" },
    programme: { type: "string" },
    picture: { type: "string" },
    url: { type: "string" }
});

const certificateRepository = db.fetchRepository(certificateSchema);

certificateRepository.createIndex();

module.exports.certificateRepository = certificateRepository
Repository.js
(RedisJSON Repository Code To issue our queries)
const {certificateRepository} = require('./schema')

//check to make sure certificate id doesn't exist already
exports.certificateIdExists = async (email) => {
    const certificate = await certificateRepository.search()
    .where('email').eq(email).return.all()
    return (certificate.length) ? true : false
}

// saveCertificateDataToDB() -> This method saves our data to the redis database
exports.saveCertificateDataToDB = async (data) => {
    try {
        let certificate = await certificateRepository.createAndSave(data)
        return certificate[0]
    }
    catch (err) {
        throw new Error("An error occured while saving the record, please try again later")
    }
}
Model.js
(Core Business Layer between the controller and our repository)
require('../../config')
const { v4 } = require('uuid')
const puppeteer = require('puppeteer');
const Repository = require('./repository')

/**
* Certificate Model -> Primary Model for our certificate package
* used for constructing and saving our certificates on the platform
*/
class Certificate {
    #name
    #email
    #track
    #startDate
    #endDate
    #programme
    #picture

    /**
    * @param {String} name
    * @param {String} email
    * @param {String} track
    * @param {String} startDate
    * @param {String} endDate
    * @param {String} programme
    * @param {String} picture
    */
    constructor(name, email, track, startDate, endDate, programme, picture) {
        this.#name = name
        this.#email = email
        this.#track = track
        this.#startDate = startDate
        this.#endDate = endDate
        this.#programme = programme
        this.#picture = picture
    }

    /**
     * This method creates and save the certificate
     * @returns {Object} Returns a javascript Object
     */
    async generate() {
        // generate certificate id
        let certificateId = generateUniqueID()
        // check if certificate id already exists
        let result = await this.#certificateIdExists(this.#email)
        if (result) {
            throw Error('The certificate with this email already exists')
        }
        // compose the certificate object
        let certificateObject = {
            certificateId,
            name: this.#name,
            email: this.#email,
            track: this.#track,
            startDate: this.#startDate,
            endDate: this.#endDate,
            programme: this.#programme,
            picture: this.#picture,
        }
        // attach certificate url to certificate object
        certificateObject.url = `${AppConfig.HOST}/assets/certificates/${certificateId}.pdf`

        // save certificate to redis
        await this.#saveCertificateDataToDB(certificateObject)

        // generate certificate pdf and url
        await this.#certificateToPDF(certificateId)

        return certificateObject
    }


    /**
     * saveCertificateDataToDB()
     * This method saves our data to the redis database
     * @param {Object} data
     * @returns {Object} Returns a certificate Object
     */
    async #saveCertificateDataToDB(data) {
        return await Repository.saveCertificateDataToDB(data)
    }

    /**
     * @param {String} certificateId
     * @returns {String} -> Returns an href string url
     */
    #certificateToPDF = async (certificateId) => {
        // Create a browser instance
        const browser = await puppeteer.launch({ args: ['--ignore-certificate-errors'] });
        // Create a new page
        const page = await browser.newPage();
        // Website URL to export as pdf
        const certificateUrl = new URL(`${AppConfig.HOST}/generate?certificateId=${certificateId}`);
        // Open URL in current page
        await page.goto(certificateUrl.href, { waitUntil: 'networkidle0' });
        //To reflect CSS used for screens instead of print
        await page.emulateMediaType('screen');
        // Downlaod the PDF
        await page.pdf({
            path: `${AppConfig.BaseDirectory}/uploads/certificates/${certificateId}.pdf`,
            margin: { top: '50px', right: '20px', bottom: '50px', left: '20px' },
            printBackground: true,
            format: 'A4',
            landscape: true,
        });
        // Close the browser instance
        await browser.close();
        return certificateUrl.href
    }
}

module.exports.CertificateModel = Certificate
Controller.js
(Our express controller code)
const fs = require('fs');
const { CertificateModel } = require('./model');
const { createCertificateSchema } = require('./schema');

// Create New Certificate
const createCertificate = async (req, res) => {
    try {
        // parse multipart-form data
        let requestBody = JSON.parse(req.body.form)
        // perform validation using joi
        await schemaValidator(requestBody, createCertificateSchema)
        // componse file path
        const picture = (req.files[0]?.path !== undefined) ? `${AppConfig.HOST}/${req.files[0]?.path.replace("uploads", "assets")}` : null
        const { name, email, track, programme, startDate, endDate } = requestBody
        let newCertificate = new CertificateModel(name, email, track, startDate, endDate, programme, picture)
        let data = await newCertificate.generate()
        res.status(200).json({
            status: "ok",
            message: "Certificate Generated Successfully",
            ...data
        })
    }
    catch (err) {
        res.status(422).json({
            error: err.message
        })
    }
}

module.exports = {
    createCertificate,
}
Route.js
(Our express route file)
// import express route functions
const { createCertificate, searchCertificate, downloadCertificate, getAllCertificates, renderAssets, generatePDF } = require('./controller')
// upload middleware
const { upload } = require('../../middleware/upload/local');
// express router
const CertificateRouter = require('express').Router()

CertificateRouter.post("/certificate", upload, createCertificate)

module.exports.Router = CertificateRouter
Testing our Project
Once we have the ui service and backend service running, simply open up: http://localhost:3000/certificate/create-certificate to run the frontend application.
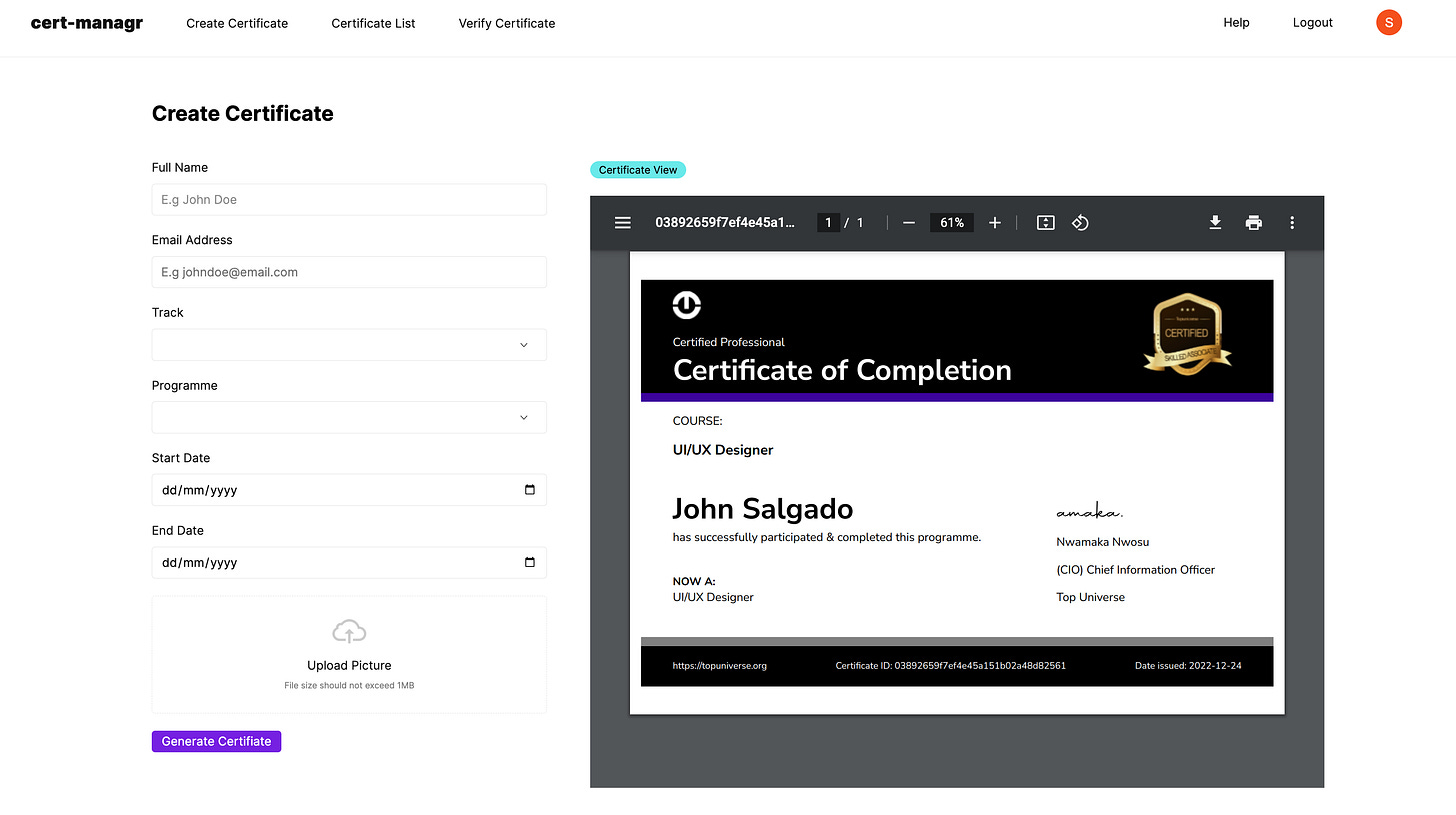
To issue a new certificate, fill the input entries and click on the generate certificate button. Ensure the selected image does not exceed 1MB.
On success, your certificate would be generated based on your input accordingly.
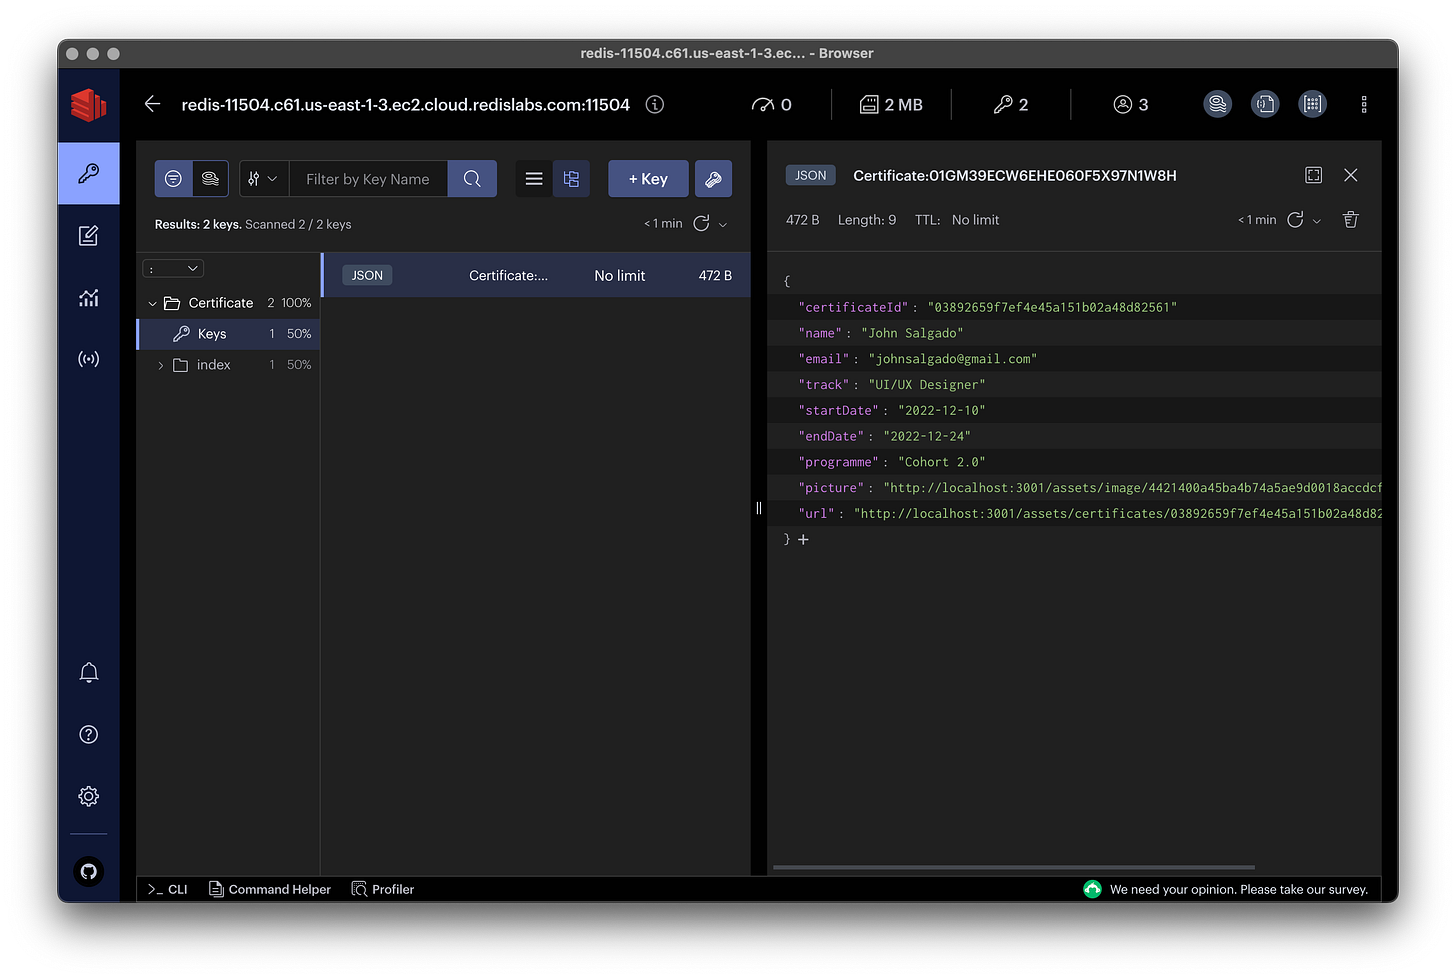
We can browser our data using the Redis Insight application.
Conclusion
Wow! that was a lot.
Redis Stack can fit into any use case. This was quite lengthy given the images and descriptions. I hope you learnt something from this article. If you think something should be amended in the post, do let me know in the comment. Thanks.
Thanks for reading. Cheers!
Valuable Links & Resources
https://redis.io/docs/stack/get-started/install/


Amazing 😍
I can't wait to try this out, sooooo excited